Wednesday, July 6, 2011

Red 5 Comics

So two bits of exciting news.  First off Cubicles is now part of Red 5's Digital First Line.  Red 5 will be publishing Cubicles through all the major digital comic platforms.  Check out the cover to Cubicles with the Red 5 logo.  Yeah, that's legit.

Next piece is that I am going to San Diego Comic Con.  I can't believe it.  I went there once as a kid and it was still small potatoes.  I have no idea what to expect with this convention.  I know it is going to be monstrous.  I will be hanging out at the Red 5 booth, helping Paul and Scott with booth type operations, spreading the awesome that is Red 5 and of course Cubicles.

Here is a press release for Cubicles.

This is super exciting for me and I want to thank everyone for supporting me along the way.

Tuesday, February 22, 2011

Cubicles in Print!

The Kickstarter project was a success!  Final total was $1,730.  173% over my goal!  So that is great news.  However, even better news is I got the printed version of Cubicles now in my hands.  Which means you can order one for yourself.  I will be putting up a more formal ordering page in the future, but if you can't wait then here's how you can order.

Just PayPal me $15 for U.S. and $20 for international.  All orders come with a quick pencil sketch.  If you want to order with my sketchbook just add $10.  It is 48 pages, full color double cover and b/w interior.  Contains pin-ups and sketches.  The prices included Shipping/Handling.

Monday, February 14, 2011

Coloring Process

So this is where the traditonal art stops.  I scan the page into the computer and it looks a little something like this.  It is a 11x17 bristol page.  I pencil with soft blue lead and mechanical pencil.  I like the ease of mechanical pencils versus traditonal wood pencils.  No sharpening.  For Cubicles I used PITT pens to ink.  Sometimes the artist in me screams to use brushes, but I find the pens fit my spastic personality.  Plus I use brushes and toothbrushes for action lines and splatters.  So it kind of works out.
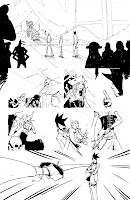
 
 So now I have to get rid of the pesky blue pencil lines.  Thanks to the magic of photoshop I am able to insert a black and white adjustment layer.  This lets me filter out blues.  Though you have to be a little careful, you can filter out the inks as well.  Also this adjustment layer got a little crazy when I got to the next step.  I also filled in all the shapes with black.  The reason I did this in photoshop and not directly on the paper was because I didn't want to waste the ink or the time.


Now what is this?  This is a haphazzard ink wash.  I just take a brush, some diluted ink and make a mess.  Believe it or not, this is on every page in Cubicles.  However its layer type was overlay, so it kind of 'vanishes'.  But not with out leaving its mark.  Observe in the next step.


 So here using a standard photoshop, gritty brush I apply some gray tones.  Besides picking a lighting direction, I don't spend much time trying to color inside the lines.  The way I draw is really sketchy and I think clean coloring would be at odds with the rest of the art.  So I just slap the colors down.  Sometimes I am inside, sometimes out and other times I don't even reach the lines.  This would usually look really bad, but since I have that ink wash mess from the step above, it looks like it makes perfect sense.  I will also go back and erase some of the gray to make it look even more sketchy.  See all the white lines around clothing creases.


Monday, January 17, 2011

How to Draw Wally

Who wants to draw Wally? Step by Step below.

By the by, Cubicles is now 100% funded. But there is still time to pledge and get some sweet rewards. Like the graphic novel for only $10 (includes shipping/handling). After Kickstarter is over, it is going to be $15. So get it now.

Pre-Order Cubicles $10


Saturday, January 15, 2011

Coloring Process Video

Coloring the cover to Cubicles. 

Pre-Order in the next 32 days for only $10 (includes shipping/handling).  Pre-Order
Also see a trailer for the comic.

Saturday, January 8, 2011

The Cover

This will be the cover to the book.  This was pencilled on 11x17 bristol.  For inking I used a combination of PITT pens and a Pentel Pocket Brush pen.  Coloring was handled in photoshop.

Page Process

Thumb
First off, I start with a really rough thumbnail.  Actually this is one of my more 'detailed' thumbs.  Sometimes it is just circles and lines.  I do this so I can see how everything will fit on the page.  Also since it is a quick process, I don't get too attached to the picture, so I am able to erase without caring too much.  Right now it is about finding the best layout and composition.  Don't worry about detail.  Adding detail makes you miss out on the larger picture.   I do these digitally on the computer.  I try to be really quick with these, maybe 10-20 minutes per page.  Once finished I print them out on 11x17 bristol using an Epson R1800 printer.  One of the few I could find that would print on large, heavy paper.

Pencil
Now we more on to the pencils.  I had varying degress of finish on pencils.  Sometimes I would do really loose and other I would do more detailed.  I find for me personally that more detail on pencils really helps my inks.  I don't have super confidence with inks, so the more thinking I can do in the pencil stage the better.  Sometimes during inking I would have to go back and re-pencil stuff I had not defined enough.  This is a more time consuming process.  Maybe taking 2-4 hours, more if there is perspective involved.  I use .7 mechanical pencils with Pilot Eno Color lead.  I use both soft blue and red.  Really great leads and they erase easily.
Ink
I am really sloppy with my inks.  I almost ink like other people pencil.  I don't like having a single line to define stuff.  The reason I do this is to keep the energy of the pencils in the inks.  Sometimes you will see pencils and say that looks awesome, then when you see the inks it looks dead.  So I try to do the inks with that same energy of the pencils.  For Cubicles I used Faber-Castell PITT pens.  Mostly XS and S sizes.  Though I did use F and M to outline larger shapes.   I did use some brush and ink for action lines and also a toothbrush for splatters.  These I could usually do in 1-3 hours.
Tone
I really wanted to do an inkwash on the pages for the toning/coloring.  However I had printed out my pages too dark.  So that thumbnail lines would have shown up in the file product.  This is a problem I will have to figure a way around.  Maybe just print it really light.  So I had to fake an ink wash digitally.  The way I pulled this off was by splattering ink wash on a blank paper, scan it in and then overlay it on my page in Photoshop.  I think but down some gray colors which picked up the overlay of washes, making it look similar to a wash.  I will be posting a how to on this in the future.  I went for a really sloppy look so these only took around 30 minutes to an hour to complete.